Objective: To use images from the photo library or your computer on your web page
Log in to your account at http://www.internetbasedfamily.com
To use the images in the Photo Library
STEP 1: Select Page
Once logged in, select the page you wish to add an image to
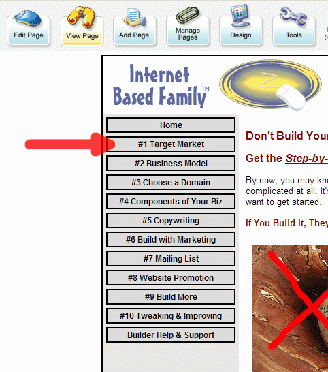
Click the “Edit Page” button from the toolbar
STEP 2: Choose an Image
Click the “Image” box on the right side of your screen
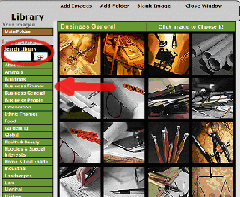
A window will pop up that looks something like this:
You can browse through images by clicking the index on the left or you can use the keyword search above the index if you’re looking for a specific type of image (pencils).
- Once you’ve found the image you want to use, simply click to highlight it
Your photo will show in the image box on the editing page.
Click “Save” at the bottom of the page and your image will show up on your web page.
Using Your Own Images
Before you can put your own images on your page, they need to be saved to your computer.
You’ll also need to double check the size of the image. Images must be 640 by 640 pixels or less to use them on your web page. If you don’t have software to shrink your photos, you might want to try one of these: http://www.fookes.com/ezthumbs/index.html or www.irfanview.com
STEP 1: Select Page
- Once logged in, select the page you wish to add an image to
- Click the “Edit Page” button from the toolbar
- Click on the “Image” box on the right (the pop-up window will appear)
STEP 2: Add Images
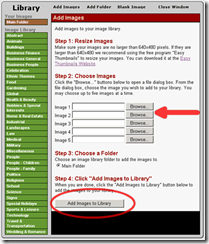
Click ‘Add Images‘ at the top of the Image Popup Window
The Add Images page will appear
- Click the ‘Browse‘ button to locate your image saved on your computer
- When you’re finished making your selection, click ‘Add Images to Library‘
You can upload up to five images at a time by repeating this step.
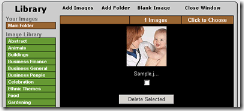
The image(s) will now appear within the window.
Click the image you want to use from the newly uploaded ones
Click the ‘Save‘ button at the bottom of the page.
Your web page will now appear with the image.
To Remove an Image
- Follow the steps above
- When the popup window opens simply choose “Blank Image”
The image box now has the caption ‘Click to put an image here…‘. This lets you know that there is no image currently in the image box.
Click the ‘Save‘ button at the bottom of the page.

